- Open your Specific Web Browser.
- Then browse Gmail through your Gmail ID.
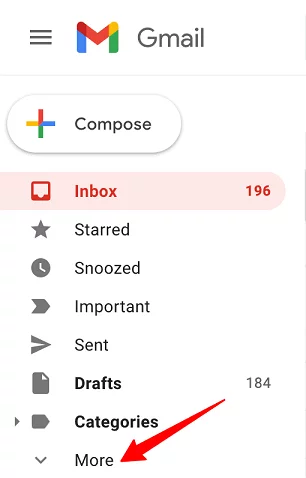
- on the sidebar when you scroll and Click on the More option.
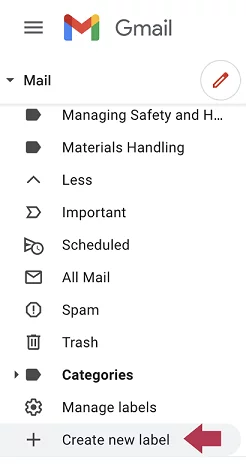
- After the sidebar expands then click on Create New Label.
- Type the name of your folder and Click to Create Folders.
Creating folders in Gmail helps to control our Gmail inbox reliably. In our digital era, emailing has become the most authentic way of sending and receiving our messages safely and quickly than ever before. Gmail is the first name that strikes our mind as soon as we think of the emailing process.
Gmail is the world’s leading communication system used by more than 1.5 billion users. We receive a lot of emails daily, and it is a difficult task to manage them, reply to them, etc. so creating folders in Gmail allows us to enhance email productivity and streamline the inbox properly.
Creating folders in Gmail is a simple process that you do within a few clicks. One thing to bear in mind, the process is different on the Desktop version and the Mobile version.

What are the Reasons to Create Folders in Gmail?
It is common sense that everything arranged properly looks beautiful and gives peace of mind as well. So we need to create folders in Gmail for the reasons given below;
- Save your inbox from cluttering
- Easily locate your required email
- Avoid spamming
- Enhance email productivity
How to Create, Sub, New, Add, Move, and Delete Folders in Gmail
Now, we move to our main topic and explain a complete guide to creating folders in Gmail.
1: Use the Sidebar to Create a Folder in Gmail for Desktop
1. Unlock your Mac/Windows, and launch your web browser.
2. Go to Gmail using your Gmail ID.
3. Scroll down to the list of folders that exist on the sidebar of your inbox, and select the ‘More’ option.
4. Expand the menu, and click on the ‘Create New Label’ tile.
5. Type the name of the new folder in the pop-up menu.
6. Finally, click on the ‘Create’ option.
2: Use Settings App to create Folders in Gmail
1. You can create labels using the Settings app. Here is how you can do it;
2. Unlock your Mac, and launch your web browser.
3. Go to Gmail using your Gmail ID.
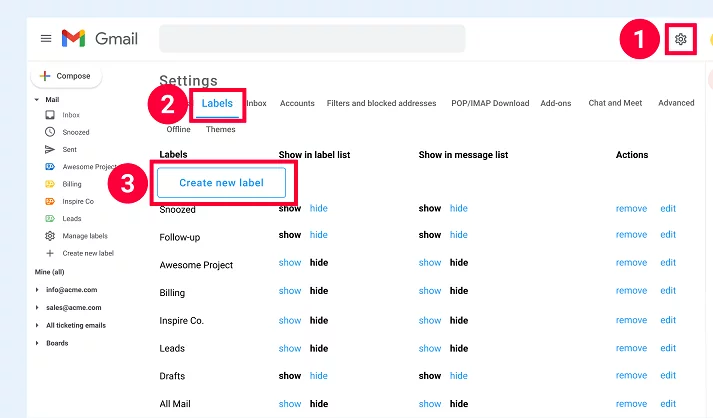
4. Click on the gear icon to select the ‘See All Settings’ option.
5. Click on the ‘Labels’ tile, and click on ‘Create new label’ by scrolling down to the screen.
7. Type the Name of the Label on the pop-up menu, and click on the ‘Save’ option.
8. From Settings you can set all preferences as well.
3: Create Folders in Gmail for mobile
As we aforementioned, the creation of folders in Gmail is different for different operating systems i.e. desktop and mobile. Here we give details to create Folders in Gmail for the mobile version. Here is how you can do it.
1. Open your mobile device, and head to your Gmail account using your browser.
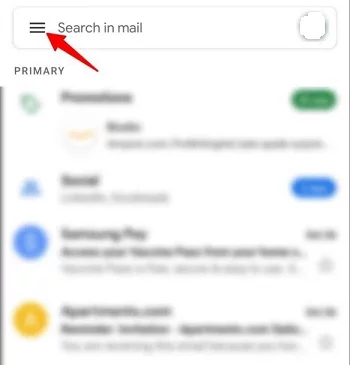
2. Click on the three vertical lines representing the Menu icon from the top of the screen.
3. Scroll down, and click on the ‘Label section’ to select the ‘Create new’ option.
4. Type the name of your new label, and hit the ‘Save’ option.
4: Create subfolders in Gmail
Here another facility is also available where you can create subfolders or additional labels. One thing to bear in mind, the subfolders can be created for the desktop version only.
Here are two methods for creating the subfolders
Designated the newly created Folder as the Subfolder
1. Unlock your Mac, and launch your web browser.
2. Go to Gmail using your Gmail ID.
3. Scroll down to a list of folders that exist on the sidebar of your inbox, and select the ‘More’ option.
4. Expand the menu, and click on the ‘Create New Label’ tile.
5. Type the name of the new folder in the pop-up menu.
6. Here you can create a subfolder by ticking the checkbox beside the ‘Nest Label under’.
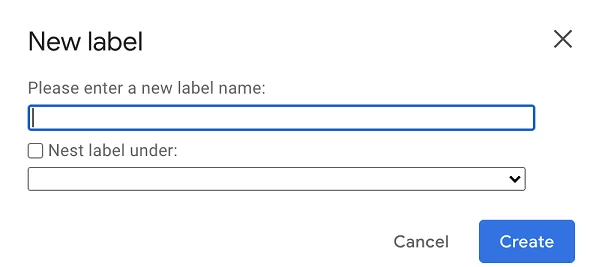
7. A pop-up will appear to ask ‘Please select a parent’, expand the available folders by clicking the down arrow.
8. Select the folder as parent for the subcategory.
9. Finally, click on the ‘Create’ option.
Create a Subfolder within a Folder
1. Open your Gmail inbox, and go to the list of folders on the left sidebar.
2. Scroll down, and select the folder you want as the parent folder for your subcategory.
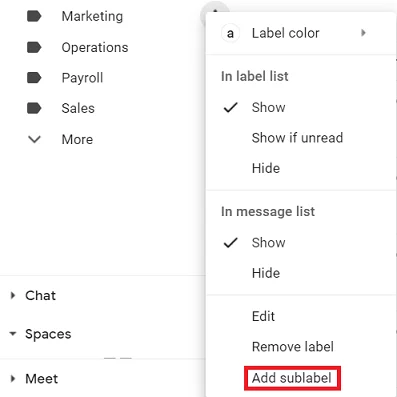
3. Click on the three vertical dots while hovering your mouse over the folder.
4. A pop-up will appear for you to select the ‘Add sublabel’ option from the bottom of the pop-up.
5: Edit or Delete a Folder
You can edit or delete labels on your desktop by following the given steps;
1. Unlock your Mac, and launch your web browser.
2. Go to Gmail using your Gmail ID.
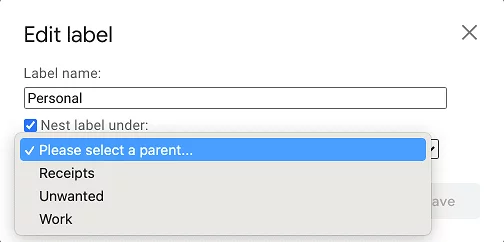
3. Click on the three vertical dots while hovering your mouse over the folder, and select the ‘edit’ option.
4. Make changes in your label, and hit the ‘Save’ option.
5. Likewise, you can delete a label. Follow the given steps;
6. Go to Gmail using your Gmail ID.
7. Click on the three vertical dots while hovering your mouse over the folder, and select the ‘Remove Label’ option.
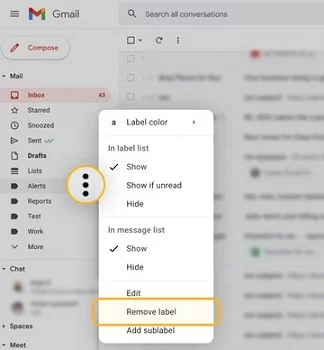
8. Hit the OK button.
6: Move Messages to Folder in Gmail
1. Open your Gmail account, and head to Inbox.
2. Select the messages you want to transfer.
3. Click on the ‘Move to’ option from the toolbar on top of the emails.
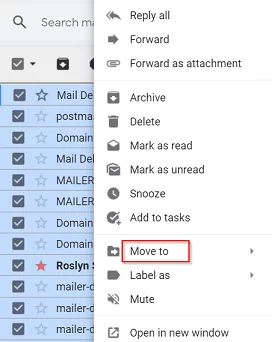
4. Select your preferred label, and hit the OK button.
7: Label a Message in the Inbox
1. Go to Gmail Inbox using your web browser.
2. Open the message, and click on the ‘Labels’ icon from the top of the message.
3. Uncheck the labels of your required messages, and type a new label.
4. Hit the ‘Apply’ button.
8: Manage Gmail Labels
1. Open the Gmail menu, and scroll down to select the ‘Manage labels’ option.
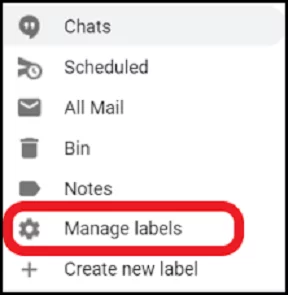
2. The label settings will open in front of you.
3. Customize the labels that you want to display in the list and the labels that you want to hide permanently.
4. It is the best option to lessen your Gmail menu.
9: Use the Filter option to Apply Labels Automatically
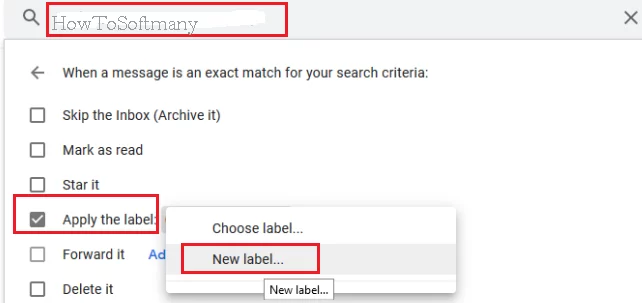
1. The filter option helps to declutter your Gmail inbox, as it automatically applies labels according to your demand. Here how is you can do it;
2. Open the ‘Show search options’ from the right of the screen.
3. Type some keywords related to your search i.e. name of sender, address, etc.
4. Click on the ‘Create filter’ option.
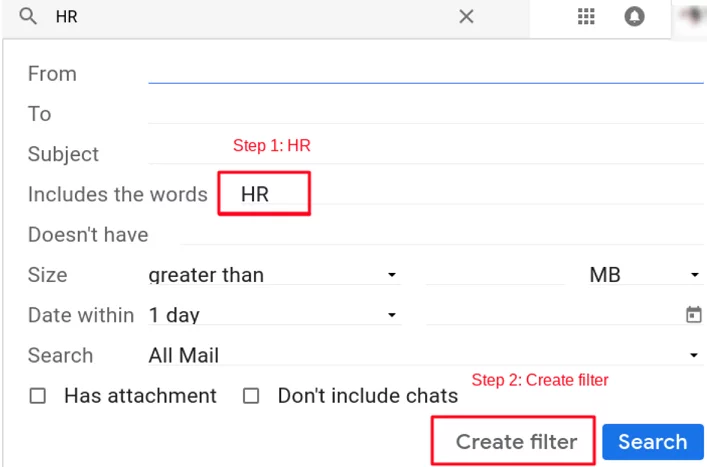
5. Click on the ‘Apply the label’ and next select the label.
6. It will label all the labels that are related to your keywords
10: Create 5 Folder Ideas for an Up-to-date Inbox
The zero inbox is the first step of your Gmail account, and you need to organize it. For this purpose, you have to create folders, as we aforementioned. After creating folders for the best management, you need to move ahead and create labels to make your Gmail inbox up-to-date for coming emails.
Here we will discuss 5 folder ideas for your ease;
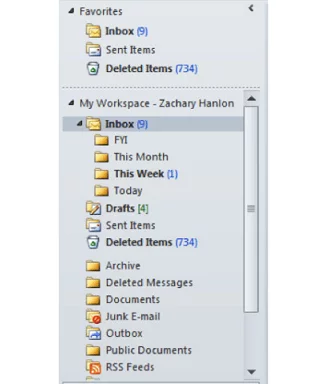
- Inbox: is the place for sending and receiving your emails.
- Today: here you need to quickly reply to or receive your emails
- This Week: here the emails are arranged from the start to the end of the week.
- This Month: here you can respond within one month period.
- FYI: here are only informational emails that you can use for reference.
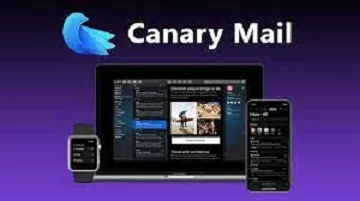
11: Use a Third-party Tool to organize your Gmail Account
You can use multiple alternative tools for organizing your emails. It will help you to get rid of creating the traditional folders and save your emails more reliably. Here will suggest Canary Mail for your ease. Here is how you can use it;
1. Open Canary Mail, and click on Preferences.
2. Click on the Folders option from the Accounts tab.
3. Scroll down to the bottom, and tap on the + sign.
4. Type the name of your folder, and hit the Apply button.
5. The folder will automatically appear on the Gmail account.
How to Make Your Gmail Secure
Email Security software is one of the best solutions to give your Gmail accounts a foolproof security. It blocks spam; and prevents phishing attempts, ransomware, malware, and other such suspicious interference from your account.
FAQs
Q: What is the difference between folders and labels on Gmail?
We use a folder as an old term for arranging the files, whereas labels are the self-explaining names i.e. Sent, Spam, Inbox, etc. which means the labels and folders are the same thing.
Q: How can I create a group in Gmail?
Open your device, and go to Google Contacts.
Click on the ‘Create label’ option while selecting from the Label section.
Type the name of the label.
Select contacts from the options; ‘Frequently contacts’ or ‘Directory’.
Add the contacts to your group while selecting them from the list.
Click the Apply option.
Q: What is the procedure for moving the emails to folders?
Use your web browser and log in to your Gmail account.
From the top menu bar, select the ‘Move To’ option.
Select the name of the folder where you send the emails, or click on the ‘Create New’ option.


