- Take a full screenshot using the PrtSc key.
- Press the Windows key or Function Key + PrtSc key simultaneously.
- Game Bar by pressing Windows Key + G.
- Use the Snip & Sketch tool to take a screenshot
- Use the Snipping Tool to take a delayed screenshot.
How to Screenshot on Windows PC and Laptop is a captured image of your on-screen content; it may be the full screen or any specific part of the screen. It is used as a reference for different purposes. It is becoming a very vital part in many ways i.e. for training purposes, product manuals, troubleshooting, or for reading purposes.
Are you interested to know about it We are discussing in detail, the entire process of taking screenshots in Windows 10, Windows 11, and Windows 8. You can take screenshots using a keyboard shortcut, the built-in Snipping Tool app, and the Xbox Game Bar.
| Shortcut Keys | Usages |
|---|---|
| Function + Print Screen | Full-Screen Capture |
| Windows Key + Print Screen | Active Screen Capture |
| Alt + M | Choose a snipping mode. |
| Shift + arrow keys | Move the cursor to select from different types of snips. |
| Alt + N | Create a new snip in the same mode as the last one. |
| Ctrl + | Save the snip |
| Ctrl + C | Copy the snip to clipboard |
| Alt + D | Copy the snip to the clipboard |
How to Take a Screenshot on Windows 11 and 10
if you want to know how to screenshots on Windows (7/10/11/8) PC/Laptop, Here is a full list of 9 Steps;
1. Windows key + Print Screen
You can take full-screen screenshots manually using a very easy method Print Screen key. It is quite easy to use a keyboard Shortcut. Follow the given steps;
- Open the desired screen, as we mentioned, it will take the full screenshot, so close all unnecessary windows.
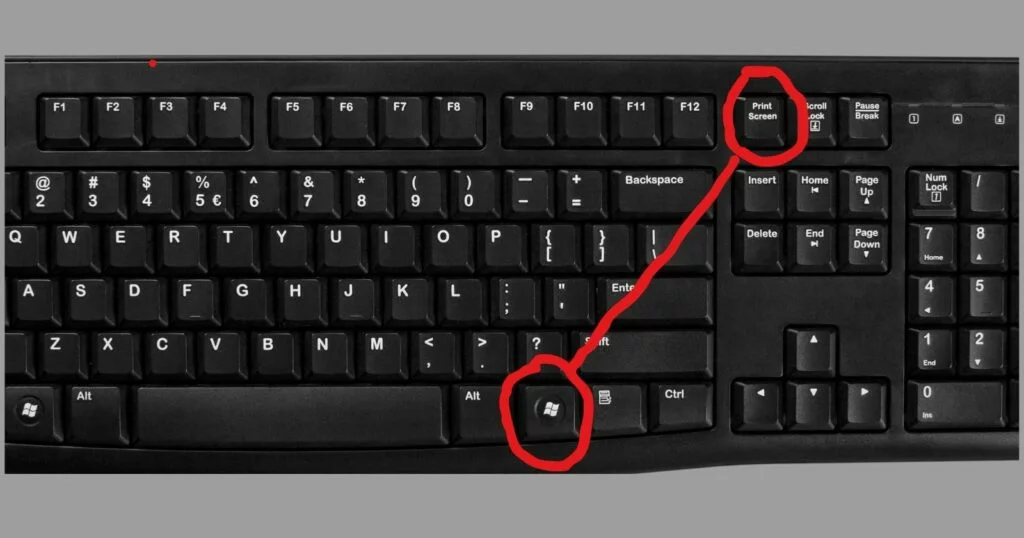
- Go for the Print Screen key from your keyboard, it is housed in the top right corner above the Numeric Keys.
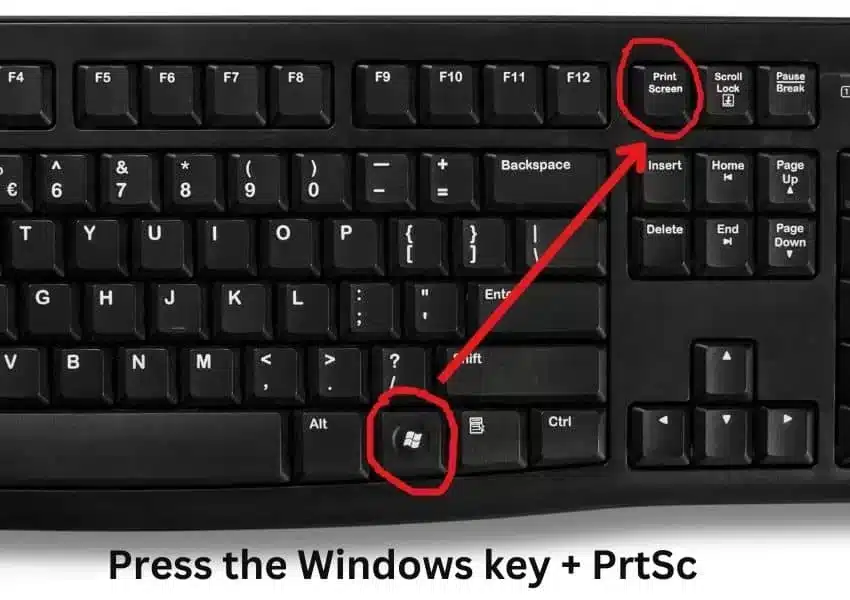
- It is abbreviated as PrtSc, press the Windows key and PrtSc altogether.
- The combined pressing will save the screenshot as a PNG file to the screenshot folder or Picture folder.
- You can also press the Fn and PrtSc buttons to capture the entire screen, and it will save to your clipboard automatically.
- It is also possible to capture a screenshot on Windows 10 by pressing the Windows key +PrtSc button and saving it to the screenshot folder or Picture folder automatically.
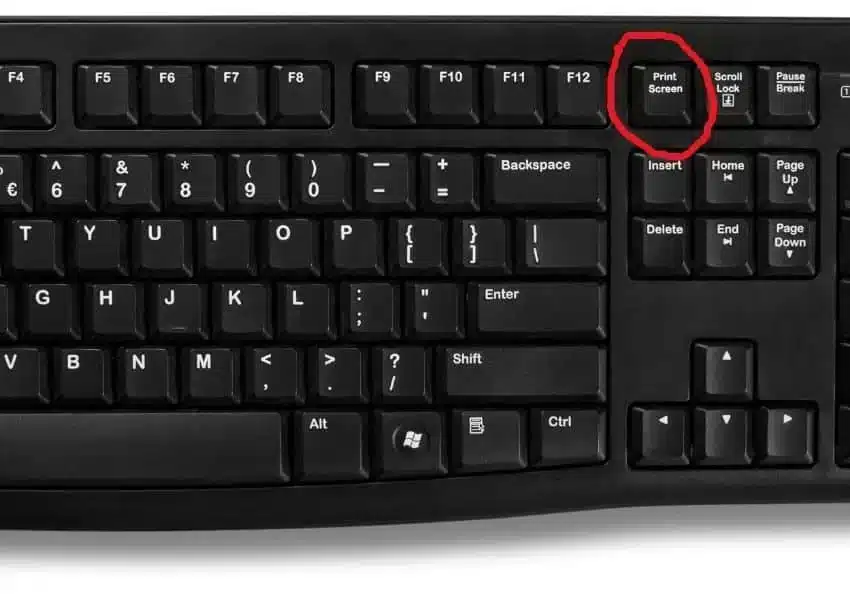
How to find Captured Screenshots using the Print Screen key?
You need to follow the given steps to get access to your captured screenshot;
- You can copy the captured screenshot, and paste it into any program i.e. Microsoft Word or Paint, or into an email message. Right-click and have your screenshot easily.
- If you capture the screenshot by pressing the Windows key + PrtSc, you need to press the Windows key + E button, open File Explorer, click on the This PC option, and select Pictures folder by double-clicking it. Next, double-click the screenshot folder, and easily open your required screenshot.
2. Alt + PrtSc Screen Capture
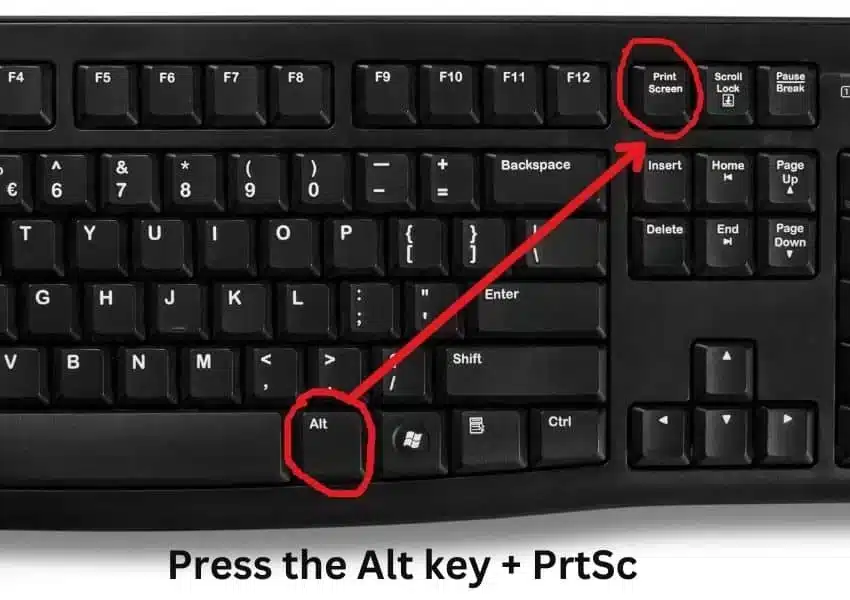
- In case of capturing a single active Window, simply use keyboard shortcuts i.e. Alt + Print Screen key.
- Press both shortcuts simultaneously, and capture the active window.
- Copy the screenshot by pressing Alt + PrtSc or Windows Print Screen key.
- The image will copy to the clipboard, and you can retrieve it by pasting any program i.e. MS Word, or Google account.
- Now you can save it as a file by pressing Windows Key + PrtSc, and it will be saved in the Screenshot folder or Pictures gallery.
3. Windows logo + Print Screen key Capture
- In Windows 10, take a screenshot by pressing the Windows logo + Print Screen key, and it will capture the screen, and save it to the Pictures gallery or Screenshot folder.
- If the Print screen button is not working properly, simply go for the Snipping tool option.
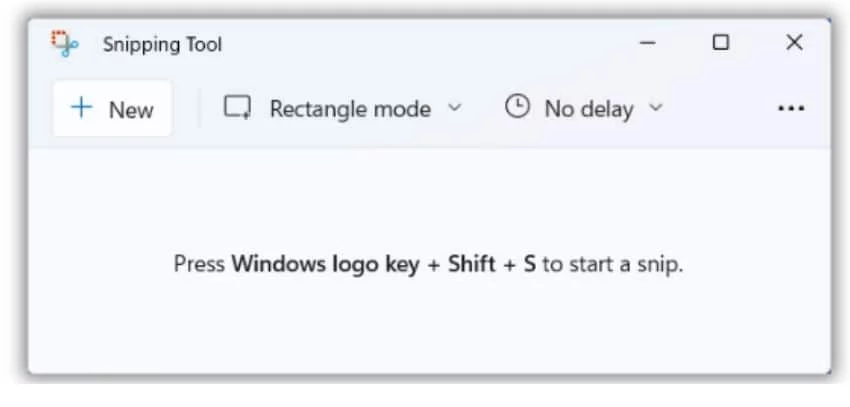
4. The Snipping Tool in Windows 11 without print screen
The snipping tool is available in all Windows, but it is available in Windows 11 with the big upgrade, and you can easily take full-screen, or partial screenshots. Please follow the given steps;
- Click on Taskbar, tap on the Show Search Box option, click on the Search option, type Snipping Tool in the search box, and hit it.
- In the tool, you will find four types of modes;
- Rectangle Mode enables you to draw a rectangle around the part you want to capture.
- Window Mode takes the exclusive window leaving all unnecessary things.
- Full-screen Mode takes the entire screen as a screenshot.
- Full-form Mode draws a shape around the area for taking screenshots.
- You have the Delay option for scheduling the time of taking screenshots. It is the best option for taking screenshots of popup menus and tooltips.
- Click on the + New option at the top right of the tool, select mode, and capture your screen easily.
- Click the File option to save your screenshot, or select the Save option to save the screenshot to your required location.
- It can be shared using the email address, simply click on File>Send to>Email recipient, or as an attachment to an email.
- You can take a print of it by clicking the File> Print option, and clicking on Edit> Copy option takes a copy of it.
- You can edit it while using several editing tools i.e. crop, erase, and so on.
5. The Snip & Sketch Tool for Windows 10, 7 & 8.1
The Snip & Sketch for Windows 10 offers the best service for customizing, annotating, or sharing your screenshots. You have to follow the given steps;
- Open the Snipping tool
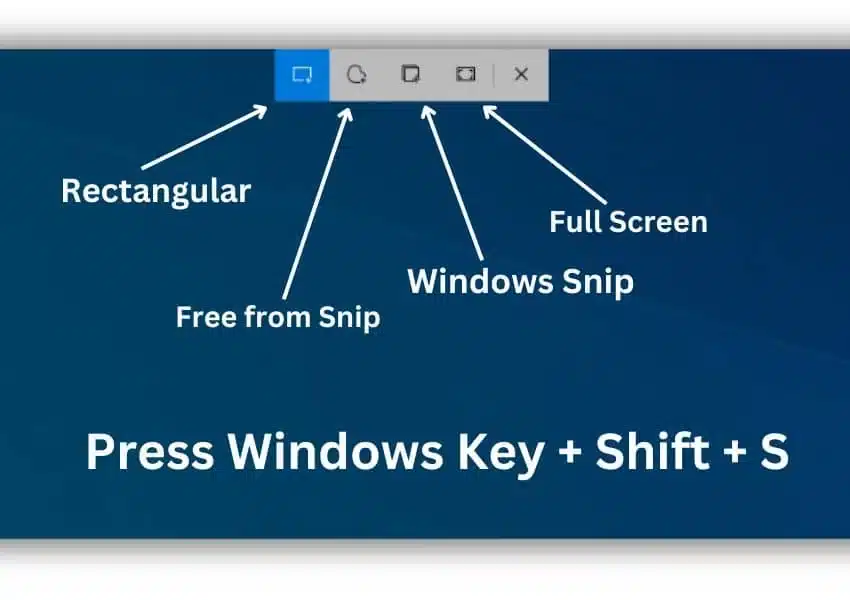
- On Windows 10, press Windows Key + Shift + S, and click it to open it. You can search the Snipping tool from the search bar also.
- On Windows 8.1, click on the taskbar, click the search option, type Snipping, and click on the Snipping tool.
- Open the tool, and you will find a dim or mini menu on top of the screen, it includes four options, you can select any, as the options are available from left to right;
- Free-form snip helps to draw a free-form shape around any specific part.
- A rectangular snip is for creating a rectangular shape around any object.
- Windows snip helps you select any window i.e. dialog box to capture.
- Full-screen snip is for capturing the entire screen.
- After selecting the option, capture your screen by pressing the New option, and will copy to your clipboard automatically.
- Press Ctrl + V to paste on any program with permission of the pasting process i.e. Microsoft Word or Google document, or it can be pasted on any image processor i.e. Paint or Photoshop.
- Your captured screenshot will be opened by the Snip & Sketch app and your car capable of annotating using a ballpoint pen, a pencil, or a highlighter.
- You can use a pen or pencil tool to add notes or text to your screenshot or erase anything with Eraser too. Keep in mind; that you can erase any extra editing process, and not the screenshot itself.
- After the editing process, save your screenshot by selecting the Save as an option, copy it to your clipboard, and share it with your contacts using your email address or via any other social media platform.
6. The Game Bar
Game Bar is also the most popular method of taking screenshots and recording your screen easily. Simply follow the given steps;
- Open the Game Bar by pressing Windows Key + G, as it comes pre-installed in Windows 10.
- Before clicking the required keys, make sure the exact window is open, you want to capture.
- You can customize the Game box by clicking on Settings> Windows settings> Game Bar.
- A dialog box will open with a popup Yes it is a game, simply click on it.
- On top of the overlay menu, tap on the Capture option, select the Camera icon, and click it.
- You can use keyboard shortcuts also Windows Key + Alt + PrtSc for the purpose.
- It will capture your screen, and save it in a PNG file to your Capture folder in File Explorer. Or you can find it in the Game Bar gallery by clicking on Show my screenshot under the screenshot button in the Capture menu.
How to Record Screen with Game Bar?
The game Bar option can also be used for the recording of any one app or active window. It can’t be switched between other windows or the entire screen. Simply follow the steps to record the clips of your game;
- Open the window exclusively, you want to record while closing or minimizing other windows, otherwise, it will record the wrong one. You need to turn off the audio also.
- Open the Game Bar by pressing Windows Key + G.
- If you add audio, you need to enable the microphone option.
- Click the on-screen dot to start recording, or you can use keyboard shortcuts Windows + Alt + R, and no need to go to Game Bar.
- A popup with a timer and two recording controls will appear on the screen.
- Complete the recording while enabling or disabling your mic, according to your requirements.
- Press Windows + Alt + R to stop the recording process, after you complete it.
- A popup Game Clip Recorded will appear in the notification panel, click it to open the Captures folder in File Explorer.
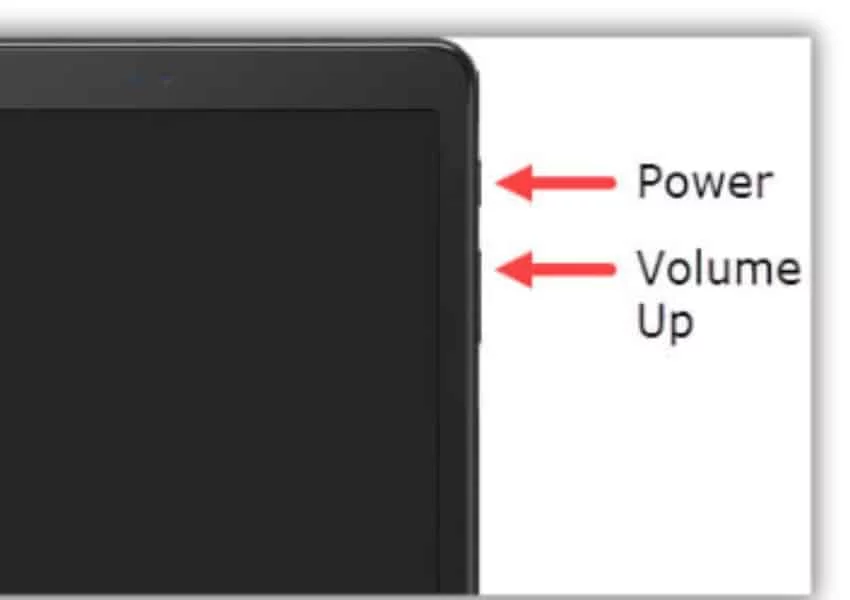
7. Power + Volume Up for Windows Tablet
- Press the Windows logo button which is housed on the bezel of the tablet.
- In case not Windows logo button is available, press the Power button.
- In case of pressing the Power button, you can select the Volume Up or Volume Down button.
- The screen will be dimmed for a while and your screen will be captured.
- The captured screen will be saved into the Capture folder in File Explorer.
8. Screenshot Several Windows in a Row without PrtSc
It is another interesting method, as Windows Step Recorder makes possible the capturing and recording of 100 screens simultaneously, and saves them all together in one document. It assists you in clicking here, and which action also. Follow the given steps.
- Open the first page, you want to capture, and press Windows logo + S to activate the search bar.
- Open Windows Steps Recorder by typing psr.exe in the search bar, and pressing Enter button.
- Tap on the Start Record option at the top corner, and enable Steps Recorder to record 25 screens simultaneously.
- You can record more than 25 by clicking first on the top right of the toolbar, clicking the Settings option, and adding the number of screens, you want to capture.
- Continue clicking on different screens, and it will change and be captured by Steps Recorder.
- Click the stop Record option on the top of the toolbar, and stop recording.
- Open your captured screens to review them.
- Save your screens as a Zip folder by clicking the save option, add your required location, and save them.
9. Capture Screenshots using Third-party Apps
Multiple third-party apps are available for taking screenshots if any of the above methods can’t offer better results. The integration of these apps makes your screen-capturing process easy and reliable. Avail extra functionality i.e. captures scrolling screen, easy and quick sharing option, and multiple other features to enhance productivity. In addition, the print screen software offered by third parties serves you in a better way. You can avail of the image editor, project management, file sharing, and several messaging features for enhancing the efficiency and functionality of the tool.
Here we are discussing some important third-party screen-sharing apps;
Lightshot
It is a freeware tool for capturing screenshots and sharing them quickly with your friends or any social media platform. it is used as a substitute for the Print Screen Key function on Windows 10. It helps you to add comments to your screenshot and perform multiple other editing activities.
Greenshot
The app is also free of cost offered by Greenshot along with a user-friendly interface. It also offers several amazing features for capturing your screen and editing it easily.
Screen Rec
It is also a free-of-charge Windows recording tool to enables the users to capture the screen and share it within a few seconds. You can avail of multiple tools i.e. annotating your captured screen or creating a link to share with your friends, so they can view your captured screen.
Snagit
It is one of the most important tools for creating GIFs, taking full-screen capture, and so on. It is a paid app and demands $50 with the 30-day free trial version. The downside of the free version is, the captured screenshots are equipped with watermarks. It is offered by Techsmith and is compatible with Windows and Mac.
Screencast-O-Matic
It is a web-based video editor as well as a screen-casting tool to record your screen with all activities. It demands a signup process for creating a free account. It is also available in the Pro version with a starting price of $4 per month.
Nimbus Screenshot
It is a freeware Windows application, as you can use it for taking screenshots of full screen, full webpage, or a specific part of the screen easily. You are capable of editing your captured screens, recording videos, and adding comments to them.
ShareX
It is a lightweight and open-source app with the capability of capturing screens in various ways i.e. full screen, monitor, freehand, and so on. It supports multiple images, text, and file-hosting services. Enjoy the hotkey settings option for an unlimited workflow.
PicPick
It is also a screen capture app for Windows and is equipped with multiple amazing tools i.e. image editor, color picker, color palette, pixel-ruler, protractor, crosshair, whiteboard, and so on. It is equally reliable for software developers, graphic designers, and home users.
FAQs
How can I take screenshots for Windows 11/10/8/7?
These are four different ways to take screenshots in Windows 11;
Windows Key + PrtSc, Function Key + PrtSc, Snip & Sketch tool, Snipping Tool.
How can I save the screenshot instantly?
Pressing of Windows Key + PrtSc creates a screenshot and it is saved to our Picture library instantly.
How many Windows versions are included with the Snipping Tool?
Snipping Tool is part of almost all Windows versions.
How can I take multiple screenshots at one time?
We have to press the Ctrl +Alt + PrtScn keys altogether. It will create a red rectangular box, and you can use the left key of the mouse while dragging the rectangle to scroll windows to select the pages.
How can I create arrows and circles on my captured screen?
Open your captured screen in any image editor i.e. MS Paint, or Adobe Photoshop, and edit it while creating arrows and circles.?


