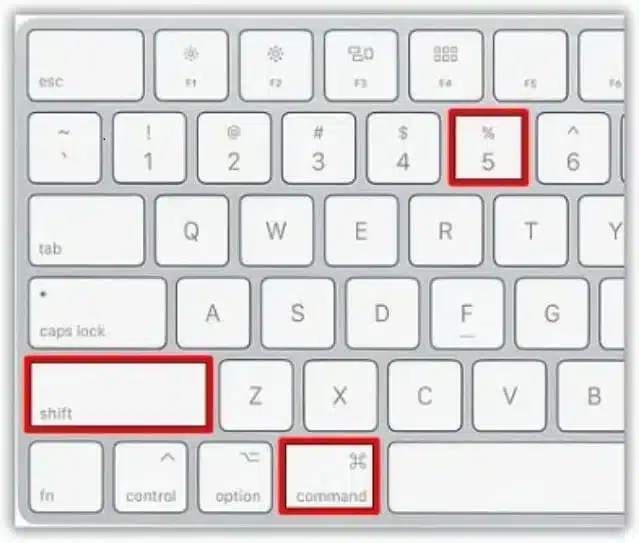
- Press Shift + Command + 5 to record your screen on a Mac
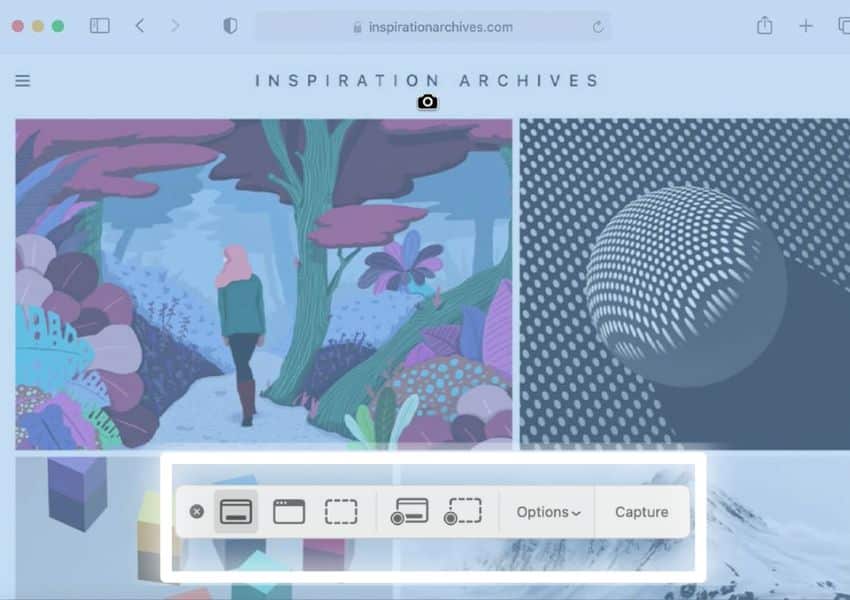
- Now Toolbar opens at the bottom of the MacBook Screen.
- Now you can Select Different options Entire Screen, Specific Area of Screen, and Screen Record with Audio.

Screen recording on MAC is a crucial part of gaming, the business community, educational departments, tech support experts, and so on. It is a very common activity for regular users of digital devices. Moreover, you can get multiple services from a recorded screen i.e. visualize the main point, explain any process or issue, create how-to-processes, record technical bugs, share games with live commentary, assist technically to your viewers, and so on.
Must-Read MAC Coverage
If you want to know about it, you are in the right place, as we discuss in the given lines, what are the common and easy methods of recording screens on macOS? It will help you to record your screen along with audio, full-screen recording, or any specific part of the Screen Record on Mac without any requirement of the type of your system.
How to Screen Record on Mac
How to Record Screen on Mac using Keyboard Shortcuts
You can record your screen on your Mac using your keyboard shortcuts; you need to follow the given steps;
- Open the Screenshot Toolbar by pressing the Shift + Command + 5 keys from the keyboard.
- The toolbar will be opened at the bottom of your screen.
- You will be offered the option to select the entire screen or a specific part of the screen.
- Press the fourth button X to record your entire screen and pressing the fifth button will allow you to record a specific part of the screen.
- Simply, hover your mouse on each icon to learn about the function of all icons.
- In case of recording any specific section of the screen, you will find a box with broken lines; drag the box from the edges to your required place.
- Click the Record option from the top right of the toolbar.
- On completing the recording process, click the circle icon from the top of the screen, and stop the process. You can press Command + Control + Esc as an alternative for stopping the recording process.

How to Record Screen with Audio on Mac using Screenshot Toolbar?
As we mentioned above, the latest Mac versions are equipped with a built-in screen recording feature and a screenshot Toolbar. It is free of charge and helps you to avoid downloading any third-party app for the purpose. But, you can record audio using the microphone, and not any internal audio i.e. sound playing in a browser window or a conversation of the online meeting, etc. To record internal audio, you need the help of any third-party app.
Just record your voice, you need to follow the given steps;
- Open the Screenshot Toolbar by pressing Command + Shift + 5, and it will activate on your screen.
- Go recording Settings option by clicking the Options icon, and adjust settings i.e. storage location, timer, microphone, etc.
- Here you have the choice of selecting recording i.e. Entire Screen or Selected Portion.
- Select Record Entire Screen and start recording by pressing the Enter key from your keyboard.
- Select Record Selected portion? and adjust the area by dragging it to your required place, and clicking the Record option.
- The control bar automatically disappears, as the recording starts.
- You can stop recording by clicking on the Stop icon, or pressing Command + Control + Esc as an alternative process.
- A thumbnail appears on the screen just for three seconds, as the recording stops. You can ignore it. Or click it for trimming or sharing.

How to Screen Record on Mac with Audio using QuickTime Player?
QuickTime Player is the best solution for recording your screen along with audio, especially for a presentation or tutorial. It also comes pre-installed on your Mac and is very easy to use. It can’t record audio directly, but, here we explain, how you can record system audio and microphone sound. You have to use QuickTime with Soundflower, a free and open-source extension that is used for passing audio from one app to another. You need to follow the given steps;
- First of all, you need to download and install Soundflower and set it as an audio output device.
- For this purpose, click on System Preferences> Sound > Output, and a list of output devices will be opened on the screen i.e. Soundflower (2ch) and Soundflower (64ch).
- Click on Soundflower (2ch), as the other is for advanced users.
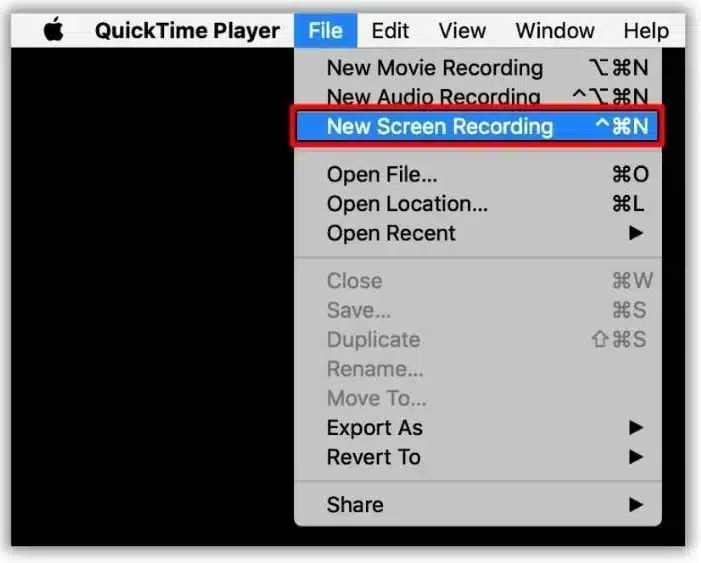
- Go to QuickTime Player, and select the Files option from the Menu bar.
- Click on New Screen Recording, and select the Options menu from the screen control bar.
- From the Options menu click on the Microphone option for selecting Soundflower (2ch).
- The Soundflower reroutes the system audio output into microphone input.
- The QuickTime Player will take it as microphone recording instead of any internal audit.
- Now, you need to select Entire Screen Recording? or Selected Portion Recording and hit the Record button to start the process.
- Stop the process by clicking on the Stop button, or press Command + Control + Esc.

Third-party Tools for MAC Screen Recording
Awesome Screenshot & Recorder
No doubt, Mac has a built-in screen recording tool, but it is limited. So you can get help from any tool to avail screen recording feature along with multiple other advanced features i.e. video editing, video annotation, cloud storage, team collaboration, and so on. Awesome Screenshot & Recorder is one of the best options. You need to follow the given steps;
- Download and install Awesome Screenshot & Recorder from the App Store.
- Launch the app by clicking on the icon that appeared on your home screen, and complete the sign-in process.
- It offers four options for the recording screen; you can select any one, and click on the Record button.
- Here you also have the option to set video quality.
- After adjusting everything, press the blue Start Recording. option.
- You will find the Pause, Recording Time, and Stop buttons in the Menu bar.
- On completing the recording, click the Stop option, and save your video in cloud storage, where you can video previewing page, download the video in MP4 format, edit it, and share it with your friends.
How to Record Screen with Internal Audio & Mic Sound Online
Awesome Screenshot & Recorder also offers an online tool for recording your screen along with internal audio & mic sound. Simply, follow the given steps;
- Insert awesomescreenshot.com in your search bar, and click to open it.
- Click the My Items option from the top of the page, and select the Record Video option.
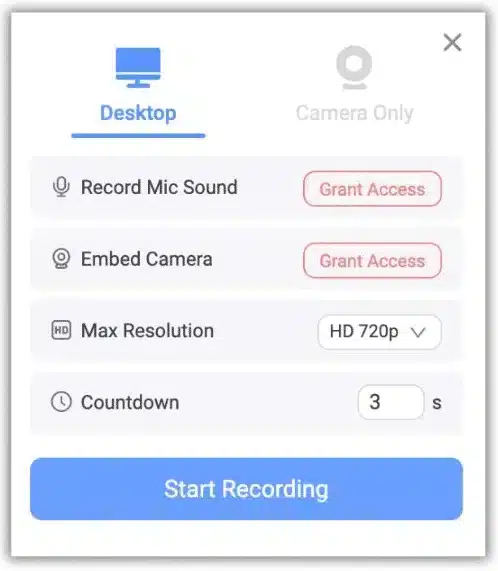
- A popup menu window will be opened to enable you to select the Desktop option.
- Here you can set video resolution, and select the option; record mic sound or camera.
- After adjusting the settings, click on the Start Recording button.
- Next, you need to select any one option; Entire Screen, Window, or Chrome Tab according to your requirement.
- After selecting the option, click on the Share option, and start recording.
- A popup window will appear on the screen to display the recording status.
- Click on the stop option to stop recording.
- Go to the My Items option to check your recorded videos or save them in MP4 format.

VEED’s Free Screen Recorder Browser Extension
It is the best solution for creating large shareable as well as customizable screens between multiple people. VEED extension is free of charge while offering limitless recordings and lengths of recordings
- Install the VEED screen recorder extension from the Chrome web store, as it is added to your Chrome browser, it will be directed to a new page.
- Now you are asked to create a free account to log, in and pin it to the browser toolbar.
- Click on the VEED icon to open it.
- It will ask permission for access to the camera and microphone.
- You can select the layout for your screen recording, as there are three layouts; Screen and webcam, webcam only, and Screen only.
- Select an external or built-in device for recording the screen with audio.
- Click the Start recording option, and select the screen i.e. Window, Entire Screen, or Chrome Tab from the popup window.
- Set your timer for recording.
- Complete the recording process and you can use different tools to make your recording effective.
- Click the Stop button, and stop the recording process, Click the Share option to share your recording.
OBS Studio
It is also a third-party tool to record professional screens as well as live streaming. It is freeware and open-source and offers incredible capabilities for both audio and video.
Snagit
It offers to record instructional videos. The simple user-friendly interface including templates offers an easy screen recording process. it is compatible with multiple platforms.
Loom
Loom with a simple and intuitive interface offers cloud storage for saving your recordings. Supported multiple platforms and advanced editing features to create awesome screen recordings.
FAQs
Is it possible to record a screen with audio without a mic?
The internal built-in microphone is available on all Macs, so you need not attach an external mic for recording sound.?
How can I locate my recorded screen on Mac?
The local or in-built capturing of screenshot tool of Mac saves your recording to the Desktop, or you can also select the location for saving the content. Whereas, QuickTime Player offers auto-opening of screenshots, as you click on Stop Recordings.?
How can I record the screen using keyboard shortcuts?
You need to press Shift + Command + 5 to record your screen on Mac.
How can I record the screen on Max without using an app?
You need to change your Privacy & Security settings. Click on the Apple Menu to select System Settings. Go to the Privacy and Security menu and enable the screen recording option by turning it on.?


